It's been one hell of a Christmas, with a lot of crazy ideas and crazier coding, and I'm now happy to announce the release of NCrunch 1.37b.
This release contains fully 64 separate fixes and features, many of which are very big. 1.37b is a big feature release, and it marks the first time that more effort was spent on developing new features in the release - where previous releases were focused more on stability.
Of course, that's not to say that stability was neglected in this build. 1.37b contains another round of bug fixes, compatibility improvements and usability enhancements.
I'll give you a quick run-through of the highlights of this release. 1.37b has seen so many improvements, it's tough to know where to start. One of the major goals of 1.37b was to get NCrunch to the stage where it can be used as a fully standalone test runner. While previous builds were still dependent on an alternative test runner for debugging support and ease of manual testing, NCrunch 1.37b is now a one-stop shop for all of your automated testing needs.
Debugging
So, of course, one of the biggest features of 1.37b is debugging of tests. NCrunch now allows you to kick off tests manually (via shortcut keys, tests window or context menu), and automatically attach the Visual Studio debugger to the runtime process. The manner in which NCrunch debugs your tests is exactly the same as the way in which it normally runs them - within a specially constructed workspace on your disk. This means you can count on the debugging execution context to be the same as the context used for the normal continuous behaviour NCrunch already gives you.
All this is well and good - but NCrunch has something a little new and special. 1.37b allows you to break into a debugging session at a specific line of code using just one command.
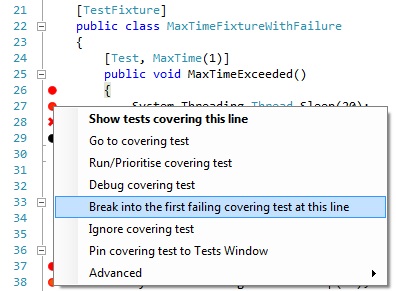
The 'Break into the first covering test' command can be accessed by right clicking on any of the coverage markers. You can also use the keyboard shortcut (Ctrl+M, B) to do this for the current line of code. When selecting the test to use for debugging, NCrunch will choose the first test shown in the normal covering tests popup window. Because failed tests are always at the top of this list, they will take precedence over any passing tests.
If you want to be specific about the test to break into, you can also access this option from the covering tests popup window.
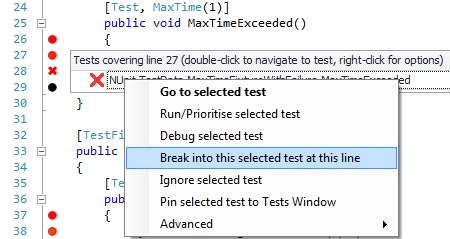
All you need to do is left-click the coverage marker, choose the test you want to break into, then right click and choose the 'break into this selected test' option.
NCrunch will handle all the setting and clearing of breakpoints for you, so there's no need to mess around cleaning up after your debugging session.
Performance Metrics
Being able to execute code while it's being written opens up all sorts of interesting opportunities to examine how this code behaves at run-time. 1.37b takes continuous testing to the next level by automatically analysing code under test to extract line-by-line execution times. There's nothing special you need to do to make use of this feature. It's completely passive. NCrunch will let you know when you have lines of code that execute slowly by marking them with a 'hot spot' on the coverage marker.
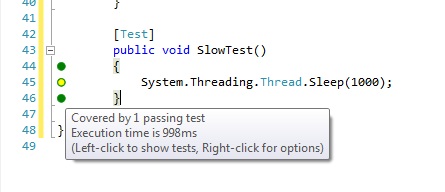
The hot spots use transparency to indicate how slow the line of code is. For example, a line with an execution time of 50ms will have a less visible hot spot than a line with an execution time of 1000ms. Because not all codebases are built the same, you can easily adjust the threshold for this in your project-level NCrunch configuration. Of course, the execution details for every line of code are also shown on the coverage marker tooltip. The tooltip will show you the total execution time for the line of code (across all tests) and it will also give you an average.
Isolated Code Coverage
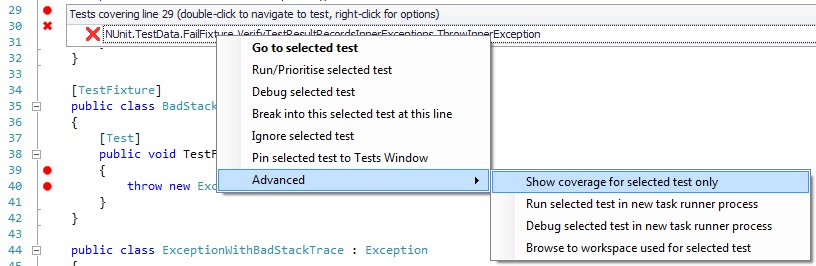
Sometimes when trying to zero-in on a performance issue or when trying to figure out why a test is failing, it can be useful to get rid of all the noise and show code coverage for one specific test only. NCrunch 1.37b adds a new feature that makes this possible. It's now possible to do this via any test context menu.
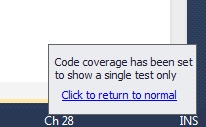
When you isolate the code coverage for a specific test, you'll notice a little popup window appear in the bottom right corner of the screen. You can click the link on this popup at any time to return your code coverage to normal.
While the coverage is isolated, you'll notice that the NCrunch coverage markers behave as though the other tests don't exist - they won't be shown in the performance metrics or on any of the coverage popup windows.
Better Keyboard Support
Many people have been asking for better keyboard support for NCrunch, and it's finally here. 1.37b adds support for a new range of context-specific shortcut keys. To make them more obvious, these are also listed in the top NCrunch menu. Of course, you can set these shortcuts to be whatever you want them to be in your Visual Studio options, but the defaults are shown here:
- Show tests under cursor (opens the covering tests popup window), Ctrl+M, S
- Show exception details under cursor (opens the covering exceptions popup window), Ctrl+M, X
- Run/prioritise tests under cursor, Ctrl+M, R
- Debug tests under cursor, Ctrl+M, T
- Break into first test under cursor, Ctrl+M, B
- Ignore tests under cursor, Ctrl+M, I
- Pin tests under cursor, Ctrl+M, P
- Run tests under cursor in new process, Ctrl+M, U
- Debug tests under cursor in new process, Ctrl+M, N
There are some new global shortcuts too:
- Run all tests right now, Ctrl+R, Ctrl+J
- Run all tests visible in Tests Window, Ctrl+R, Ctrl+K
- Run all tests pinned to Tests Window, Ctrl+R, Ctrl+P
The coverage popups have also been adjusted to be more keyboard friendly, so you can easily navigate them with the cursors or close them by pressing ESC.
Engine Modes
Manual testing has existed in various different forms for previous versions of NCrunch, and now 1.37b has finally formalised this with the introduction of 'Engine Modes'. You'll notice that the top menu option to disable automatic testing has now been replaced with a new sub-menu.
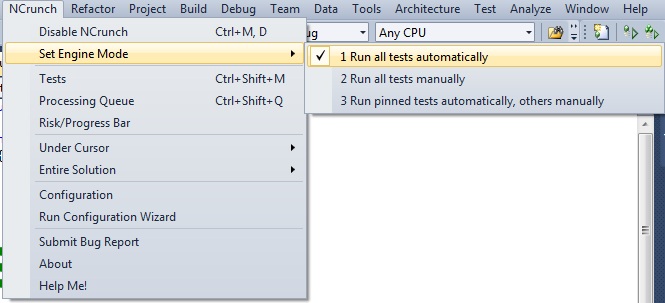
When set to run tests automatically, NCrunch behaves as normal - it will run all unignored tests continuously as soon as changes to your codebase are detected. When set to run tests manually, NCrunch will not automatically queue any tests for execution unless specifically told to. Of course, you will still have all the benefits of persistent code coverage, improved prioritisation, parallel execution and performance metrics - you just need to trigger the tests manually.
The new 'Run pinned tests automatically' mode is best described as 'semi-continuous'. When in this mode, NCrunch will only automatically queue tests for execution if they have been pinned to the Tests Window. This mode is ideal if you still want many of the benefits of a continuous test runner on a solution that may not have been designed with continuous testing in mind.
Exception Stack Navigation
Navigating around exceptions has often been problematic with NCrunch, so 1.37b introduces a new feature to make this easier. It's now possible to open a new popup window by left-clicking on a coverage marker that shows an exception.
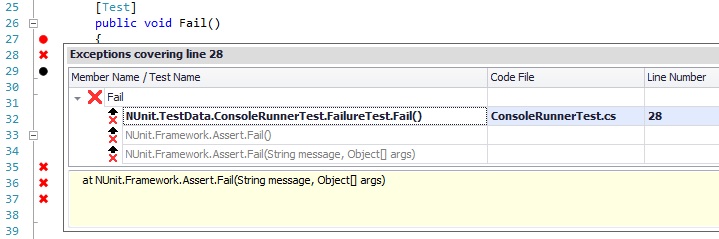
This popup window will show you the applicable stack trace for all exceptions covering the line of code you selected. The stack entry that matches the current line of code will be shown in bold, and stack entries from foreign libraries (outside of the accessible codebase) are shown in grey. You can easily navigate up and down the call stack by double-clicking on any of the stack entries. Of course, this can be keyboard driven too.
Isolated Tests
When using NCrunch against an existing codebase, it's quite common to find tests that are sequence dependent or contain nasty side-effects. NCrunch 1.37b introduces a new attribute that can be used to let the execution engine know about problematic tests that should be run in isolation.
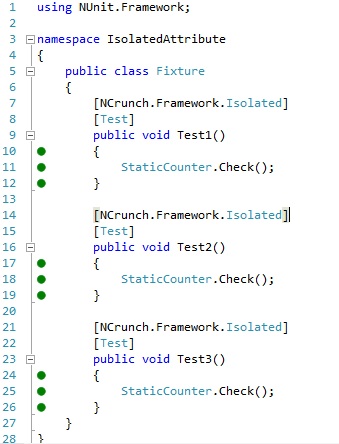
Tests that are adorned with the [Isolated] attribute will never be run in the same task runner process as other tests. Instead, NCrunch will spawn a task runner process that is specific to just the test, and will never re-use the process. In the example above, each of the tests will be run in a completely separate process with no shared state between them. Obviously there are performance implications involved in marking tests like this (so I wouldn't recommend doing it for every test), but if you have tests that are particularly complex and/or inconsistent, this little attribute could save you some time. You can find it in the NCrunch.Framework DLL that is automatically installed into the GAC along with NCrunch.
Other Changes
I've done my best to list the bigger features here, but in all truth this is only scratching the surface of what NCrunch 1.37b can offer you. Go grab yourself the new version and write some awesome code!
 Subscribe